Camera Calibration
ReMoCapp is an AI based application that can work with various camera models and lets you use almost all typical webcams to capture motions. This AI application requires two or more simultaneous video stream from different angles of an actor which you want to capture his/her body motions.
Before a motion capture session can be started, the application needs the camera calibration data for every camera used. Please follow the steps below to calibrate a camera.
Print the chessboard file
You will need a 9x7 black and white chessboard figure to calibrate the camera. After printing this file on plain white paper, stick it to a flat stiff cardboard.
- We recommend to print the file on an A3 paper size if you can. Otherwise an A4 paper is OK too.
- There should be a bit of white space around the shape (do not cut the paper to the edge of the black squares).
- The printed shape should not be stretched (It means the ratio of each square's sides should be exactly 1:1).
Click here to download the chessboard file.

Measure the printed paper
After printing the chessboard shape, measure the length of the shape in milimeters.

Now use the measured length as the value of Chessborad length in the Application Settings tab.
Calibrating camera
It's enough to calibrate each camera only once. You will be able to save the camera parameters in a config file and load the calibration file later when needed. As the calibration process requires you to see the monitor, we recommend to calibrate cameras one by one in front of your PC desk; alternatively, if you prefer to first place the cameras at their desired location for capturing, you may have to do the calibration with two persons (one person to handle the chessboard, and the other to help with checking the monitor).
Calibration parameters for each camera resolution is different from another. You will need to perform the calibration process for other resolutions separately if you want (we recommend starting with the minimum resolution first).
Loading cameras
Do the following steps before calibrating:
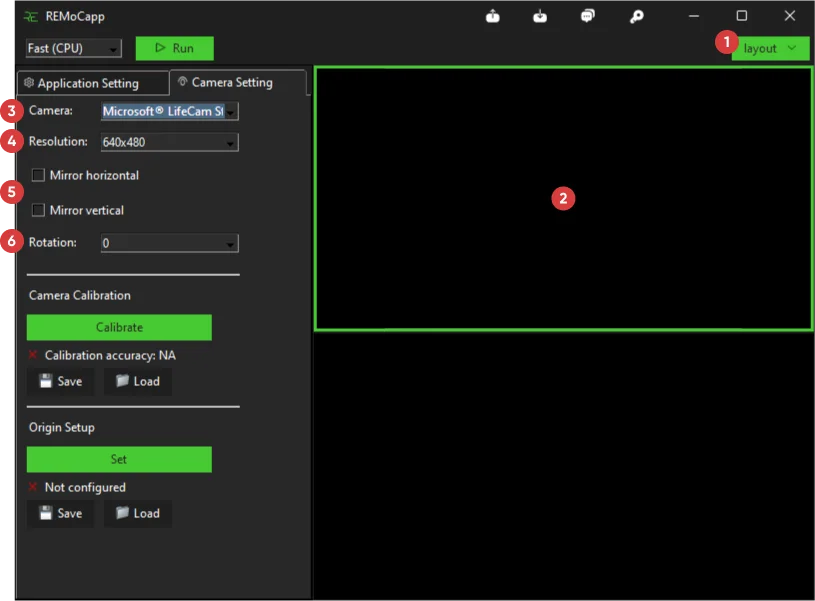
1. Layout: Click on Layout drop down menu located in the top right of the main window and choose a layout that fits your needs. If you decide to place cameras vertically, there are suitable layouts available for doing so.
2. Select the Camera Settings tab, and choose a camera frame.
3. Camera: From the left panel, select an available camera. The camera will be assigned to the selected frame.
- When you select any camera frame, parameters inside Camera Settings tab will change in regards to the focused frame.
- If you can't see your camera name, you need to check if the camera driver is installed properly.
- ReMoCapp can detect most common webcams. Cameras that require special apps to have their output displayed, may not get recognized by ReMoCapp.
- If you're not able to see your camera output in the related frame, please check if you've not currently loaded that camera in any other application.
4. Resolution: Pick a resolution from the drop down menu.
- In most cases, 640x480 is enough.
- A higher resolution will affect the frame rate when real-time capturing is in progress. If you are experiencing very low frame rates, please consider choosing a lower resolution to work with.
- Each camera resolution requires its own calibration to be performed.
5. Mirror horizontally and vertically: If the displayed camera output is mirrored horizontally or vertically, you can fix it using the options available here.
Please make sure that the camera output is not mirrored. To do so, you can simply raise your right hand in front of the desired camera. Now watch the camera output displayed in the related frame; the right hand should be raised there too.
6. Rotation: Rotates the camera output in the selected frame by the amount you pick from the drop down menu. Pick the option that corrects the camera frame rotation.
Camera lens calibration
To start the calibration process for each camera, select the camera frame and from the left sidebar click on the green Calibrate button.
When the Camera Calibration window opens, you need to move the chessboard paper in front of the camera so that the red dots gradually pass from the entire grid tiles.
Try position the chessboard paper so that it's surface is perpendicular to the camera lens. The distance between the chessboard paper and the camera lens should be as such so that each tile of the grid includes more chessboard squares.
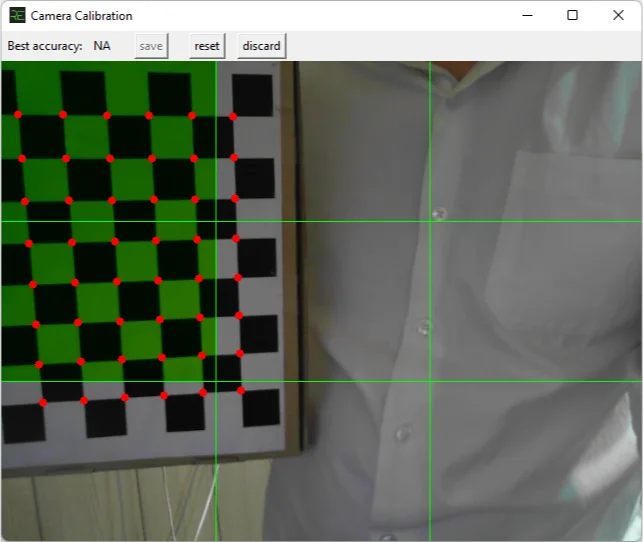
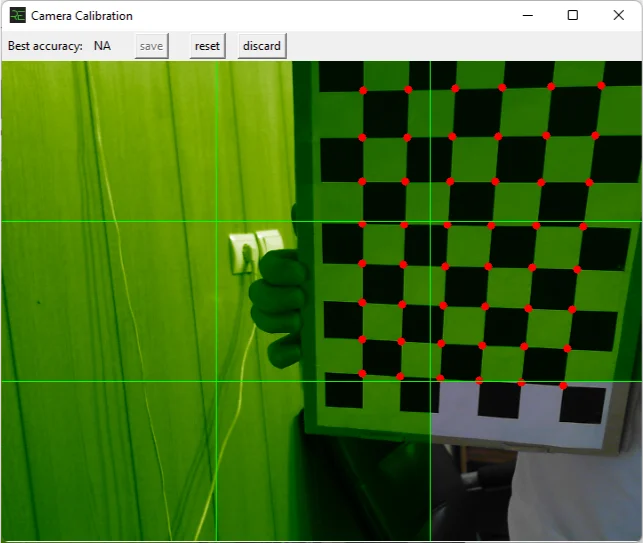
- To get high quality camera calibration, try keep the distance between the chessboard paper and the camera lens fixed while moving between tiles.
Once all the tiles in the grid turn green, the calibration is done and the quality will be shown in front of Best accuracy. If you're happy with the results, you can click on Save to store the calibration data for the camera. If you want to perform the calibration from the beginning you can click on Reset button to do so. Additionally, if you don't want to save the current calibration you can click on Discard to get back to the main application window and nothing gets saved.
- Camera calibration data will be lost if you exit the application. Calibration results can be exported and imported for each camera using Save and Load buttons located in the Camera calibration section respectively.
- If you've calibrated a camera and exported the calibration result, you don't need to perform the calibration process again when you open the application the next time (unless the resolution or the orientation is different).
Scene Setup
Once you've done the camera calibration, the next step is to setup the scene for each camera. In doing so, ground level is detected and scene axes are set.
First, you'll need to print the origin marker image to continue the setup.
- We recommend to print the file on A3 paper if you can. Otherwise an A4 paper is acceptable too.
- There should be a bit of white space around the shape.
- The printed shape should not be stretched.
- Stick the paper on a flat thin cardboard.
Click here to download the origin marker file.

After printing the origin marker image, measure the length of the shape in milimeters.

Now use the measured length as the value of Origin marker length in the Application Settings tab.
Click on Set button located under Scene Setup section. A window will open as you see below:
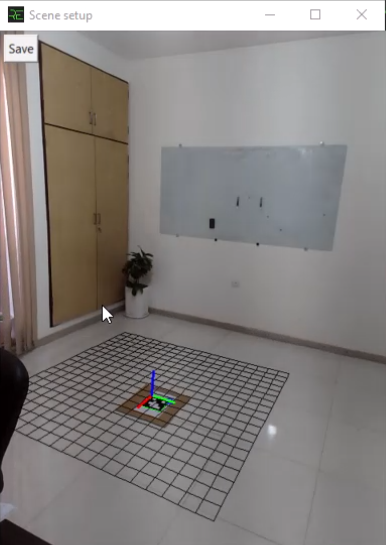
A grid will be drawn based on how the origin marker paper is put. If camera calibration has been done properly in the previous steps, the grid will be aligned to the origin marker paper and its placement matches the perspective of the environment. Click on Save button to apply the results.
- Scene setup configuration can be saved and loaded for each camera using Save and Load buttons located in the Scene setup section respectively.
- Origin marker paper should stay in the same position and direction for all the cameras being configured; otherwise, the motion capture quality will be affected.
- Changing USB ports between same cameras(i.e. same brand and model), may cause the camera names to be detected differently when you open the app the next time. In this case, make sure to load the proper config file for the cameras or perform the scene setup process again to ensure having the correct configuration data.
- If position of a camera is changed during the scene setup process, you have to perform the setup again for all the cameras.
- It's recommended to perform scene setup process again if you're not sure that the configuration is correct or not.
You can watch the whole process using the following video: